Difference between revisions of "Kamiki Boulder Skip"
(Adding collision images) |
(→Collision Images: fixing file link redirect) |
||
| Line 17: | Line 17: | ||
===Collision Images=== | ===Collision Images=== | ||
<gallery heights=180px widths=320px> | <gallery heights=180px widths=320px> | ||
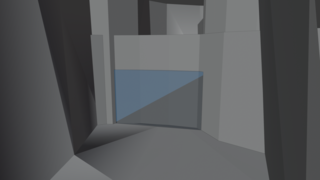
In game overview diagram.png|alt=A diagram showing the path and actions taken in-game during the D Boost method of Kamiki Boulder Skip|A diagram showing the path and actions taken in-game during the D Boost method of Kamiki Boulder Skip | Kamiki Boulder Skip In game overview diagram.png|alt=A diagram showing the path and actions taken in-game during the D Boost method of Kamiki Boulder Skip|A diagram showing the path and actions taken in-game during the D Boost method of Kamiki Boulder Skip | ||
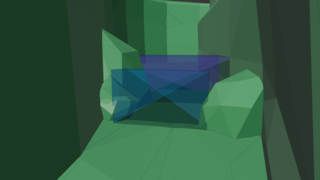
Kamiki Boulder Skip Collision Overview.png|alt=The collision of the boulder area, from roughly the same perspective as the in-game image. The trigger for getting dialog from bonking on the rock is blue.|The collision of the boulder area, from roughly the same perspective as the in-game image. The trigger for getting dialog from bonking on the rock is blue. | Kamiki Boulder Skip Collision Overview.png|alt=The collision of the boulder area, from roughly the same perspective as the in-game image. The trigger for getting dialog from bonking on the rock is blue.|The collision of the boulder area, from roughly the same perspective as the in-game image. The trigger for getting dialog from bonking on the rock is blue. | ||
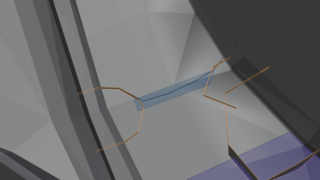
Kamiki Boulder Skip Scenery Overview.png|alt=The polygons onto which visible textures are placed, from the same perspective as the collision image. The loading zone to Shinshu is purple.|The polygons onto which visible textures are placed, from the same perspective as the collision image. The loading zone to Shinshu is purple. | Kamiki Boulder Skip Scenery Overview.png|alt=The polygons onto which visible textures are placed, from the same perspective as the collision image. The loading zone to Shinshu is purple.|The polygons onto which visible textures are placed, from the same perspective as the collision image. The loading zone to Shinshu is purple. | ||
Latest revision as of 00:10, 20 February 2024
Note: This page describes a glitch, trick, or exploit. To see others, click here.
Explanation
At the beginning of the game, Ammy is prevented from leaving cursed Kamiki to Shinshu by a large boulder. It's possible to go over this boulder in order to reach the loading zone to Shinshu and leave Kamiki early. This skips obtaining Sunrise and un-petrifying the villagers, and has various effects later in the game.
In NG+
It's possible to skip this boulder via KT's.
It is performed by doing a wall jump to the left of the boulder and then doing a KT arcing around an invisible wall that extends higher than the boulders themselves. It is possible to get stuck inside the boulder, but with successive KTs you can still escape.
Demonstration: https://youtu.be/IA6FxpIdxRM?t=287
In NG and NG+ 2017
The boulder can similarly be cleared by performing a Dialogue Boost instead of a KT. Tackling the boulder after doing the wall jump results in a textbox from Issun, where he chides Ammy for trying to break it with her head. You can hold the fast text button to clear this textbox quickly, perform a ground tackle on a 1-frame window, wall jump off the left wall again, and curve back around to get over the boulder collision. Although it is possible to do boulder skip in other languages, dialogue boosting is most quickly and effectively performed in Japanese.
Demonstration: https://youtu.be/qjFbOdZzRUw
Collision Images

A diagram showing the path and actions taken in-game during the D Boost method of Kamiki Boulder Skip
The collision of the boulder area, from roughly the same perspective as the in-game image. The trigger for getting dialog from bonking on the rock is blue.
The polygons onto which visible textures are placed, from the same perspective as the collision image. The loading zone to Shinshu is purple.
An orthographic view from above of the boulder area collision. North is up.


Kamiki Killer
Performing the Boulder Skip without obtaining Sunrise usually presents no obstacle, as every "required" usage of it only checks for Ammy to draw a circle, rather than to actually create a Sun. The main downside is that Ammy cannot use Sunrise to set the time-of-day. Surprisingly, however, the bridge you are supposed to Rejuvenate on the way to the triple-devil-gate room in Tsuta Ruins cannot be Rejuvenated unless you have Sunrise. It's unknown why this particular obstacle checks for Sunrise, but it means that a different approach must be taken to reaching the triple gate room than intended. In NG+ this is done by simply KT'ing up to the end of the bridge immediately upon entering the dungeon. In NG runs (and NG+ runs not using BKT's to do the NG+ method), this is done by using Double Jump to clear the high invisible wall around the edge of the broken bridge and maneuvering to a small piece of collision. From there, Ammy can tackle jump and double jump to clear the invisible wall on the far side of the bridge.
Demonstration: https://youtu.be/i_edKOP87-M
Reverse Boulder Skip
In NG All Brushes and NG+ All Brushes, you have to return to Kamiki after getting Bloom to get Water Lily and Sunrise. However, the boulder is still there, and Ammy spawns inside of it. There are several methods to escape.
One option is to clip out of the boulder using the acute angle seam on the left, then clipping through the invisible wall in front of the boulder. (https://youtu.be/wyMdFWMfjmM).
An alternative is to do an almost-blind KT to clip through the boulder and get on top of it. Going to the right side and holding backwards during the wall jump keeps the camera closer to Ammy, avoiding a completely blind KT.
Demonstration: https://youtu.be/IA6FxpIdxRM?t=672
Side effects
Because you never go through the sequence of restoring Kamiki, some properties of cursed Kamiki remain when returning. There are still whisps of mist, and some of the villagers are still petrified. The cherry blossoms can still be bloomed.
Because Mushi's Mom remains petrified, you can dig up all the turnips without obstruction. You can still present the Oddly-Shaped Turnip to Mushi, despite him being petrified. During the dialogue, Mushi will still move his head as though he were restored.
Demonstration: https://youtu.be/nfCAEMh-hjs?t=718
History
The NG variant was first theorized alongside the discovery of Dialogue Boosting by LegoerofEggos on 23 March, 2021 (https://twitter.com/legoerofeggos/status/1374513348440584192 mirror), and first successfully demonstrated by Auride the same day (https://youtu.be/qjFbOdZzRUw)